스파르타코딩 클럽/개인과제
11. 스파르타 코딩클럽 [본캠프 - 계산기 앱 : 정수기]
UDDT
2025. 3. 26. 10:46

Ch 3. 앱 개발 입문 주차 과제

⎮ 최초 요구사항
과제 : 간단한 약식 계산기 앱을 개발하세요!
- 소수점을 고려하지 않은, 정수형 계산만 합니다
- 모든 연산 버튼을 클릭할때마다 계산이 이루어지는 것은 아닙니다.
- 등호 버튼 (=) 을 클릭했을 때만 연산이 이루어지도록 합니다.
- 수식 문자열이 들어왔을 때 이를 계산해주는 Swift 의 기본 제공 기능을 활용합니다.
사실 이번 과제를 진행하면서, SnapKit이라는 라이브러리를 사용해도 되겠지만,
SnapKit을 사용하지 않고 구현을 해봐야 SnapKit을 더 잘 활용할 수 있을 것 같다는 객기(?)가 생겼다.
SnapKit은 치워두자.
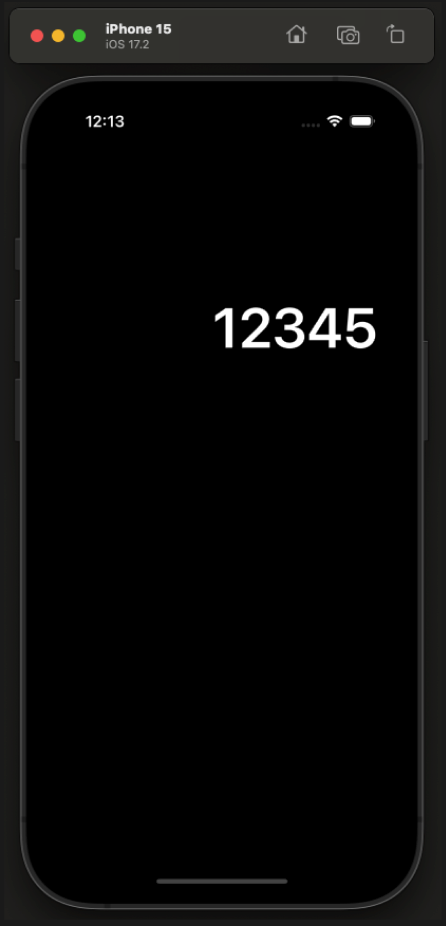
⎮ Lv. 1
1. UILabel 을 사용해서 수식을 표시할 수 있는 라벨을 띄웁니다.
- 속성 backgroundColor = .black
- textColor = .white
* 우선, 텍스트는 12345 로 고정
- 텍스트 오른쪽 정렬
- Font = 시스템 볼드체, 사이즈 60
- AutoLayout leading, trailing = superView 로 부터 30 떨어지도록 세팅
- top = superView 로 부터 200 떨어지도록 세팅
- height = 100
먼저, 코드베이스UI로 구현하기 위한 기본 세팅을 해줬다.
1. main StoryBoard 지우기

2. Info > StoryboardName 지우기
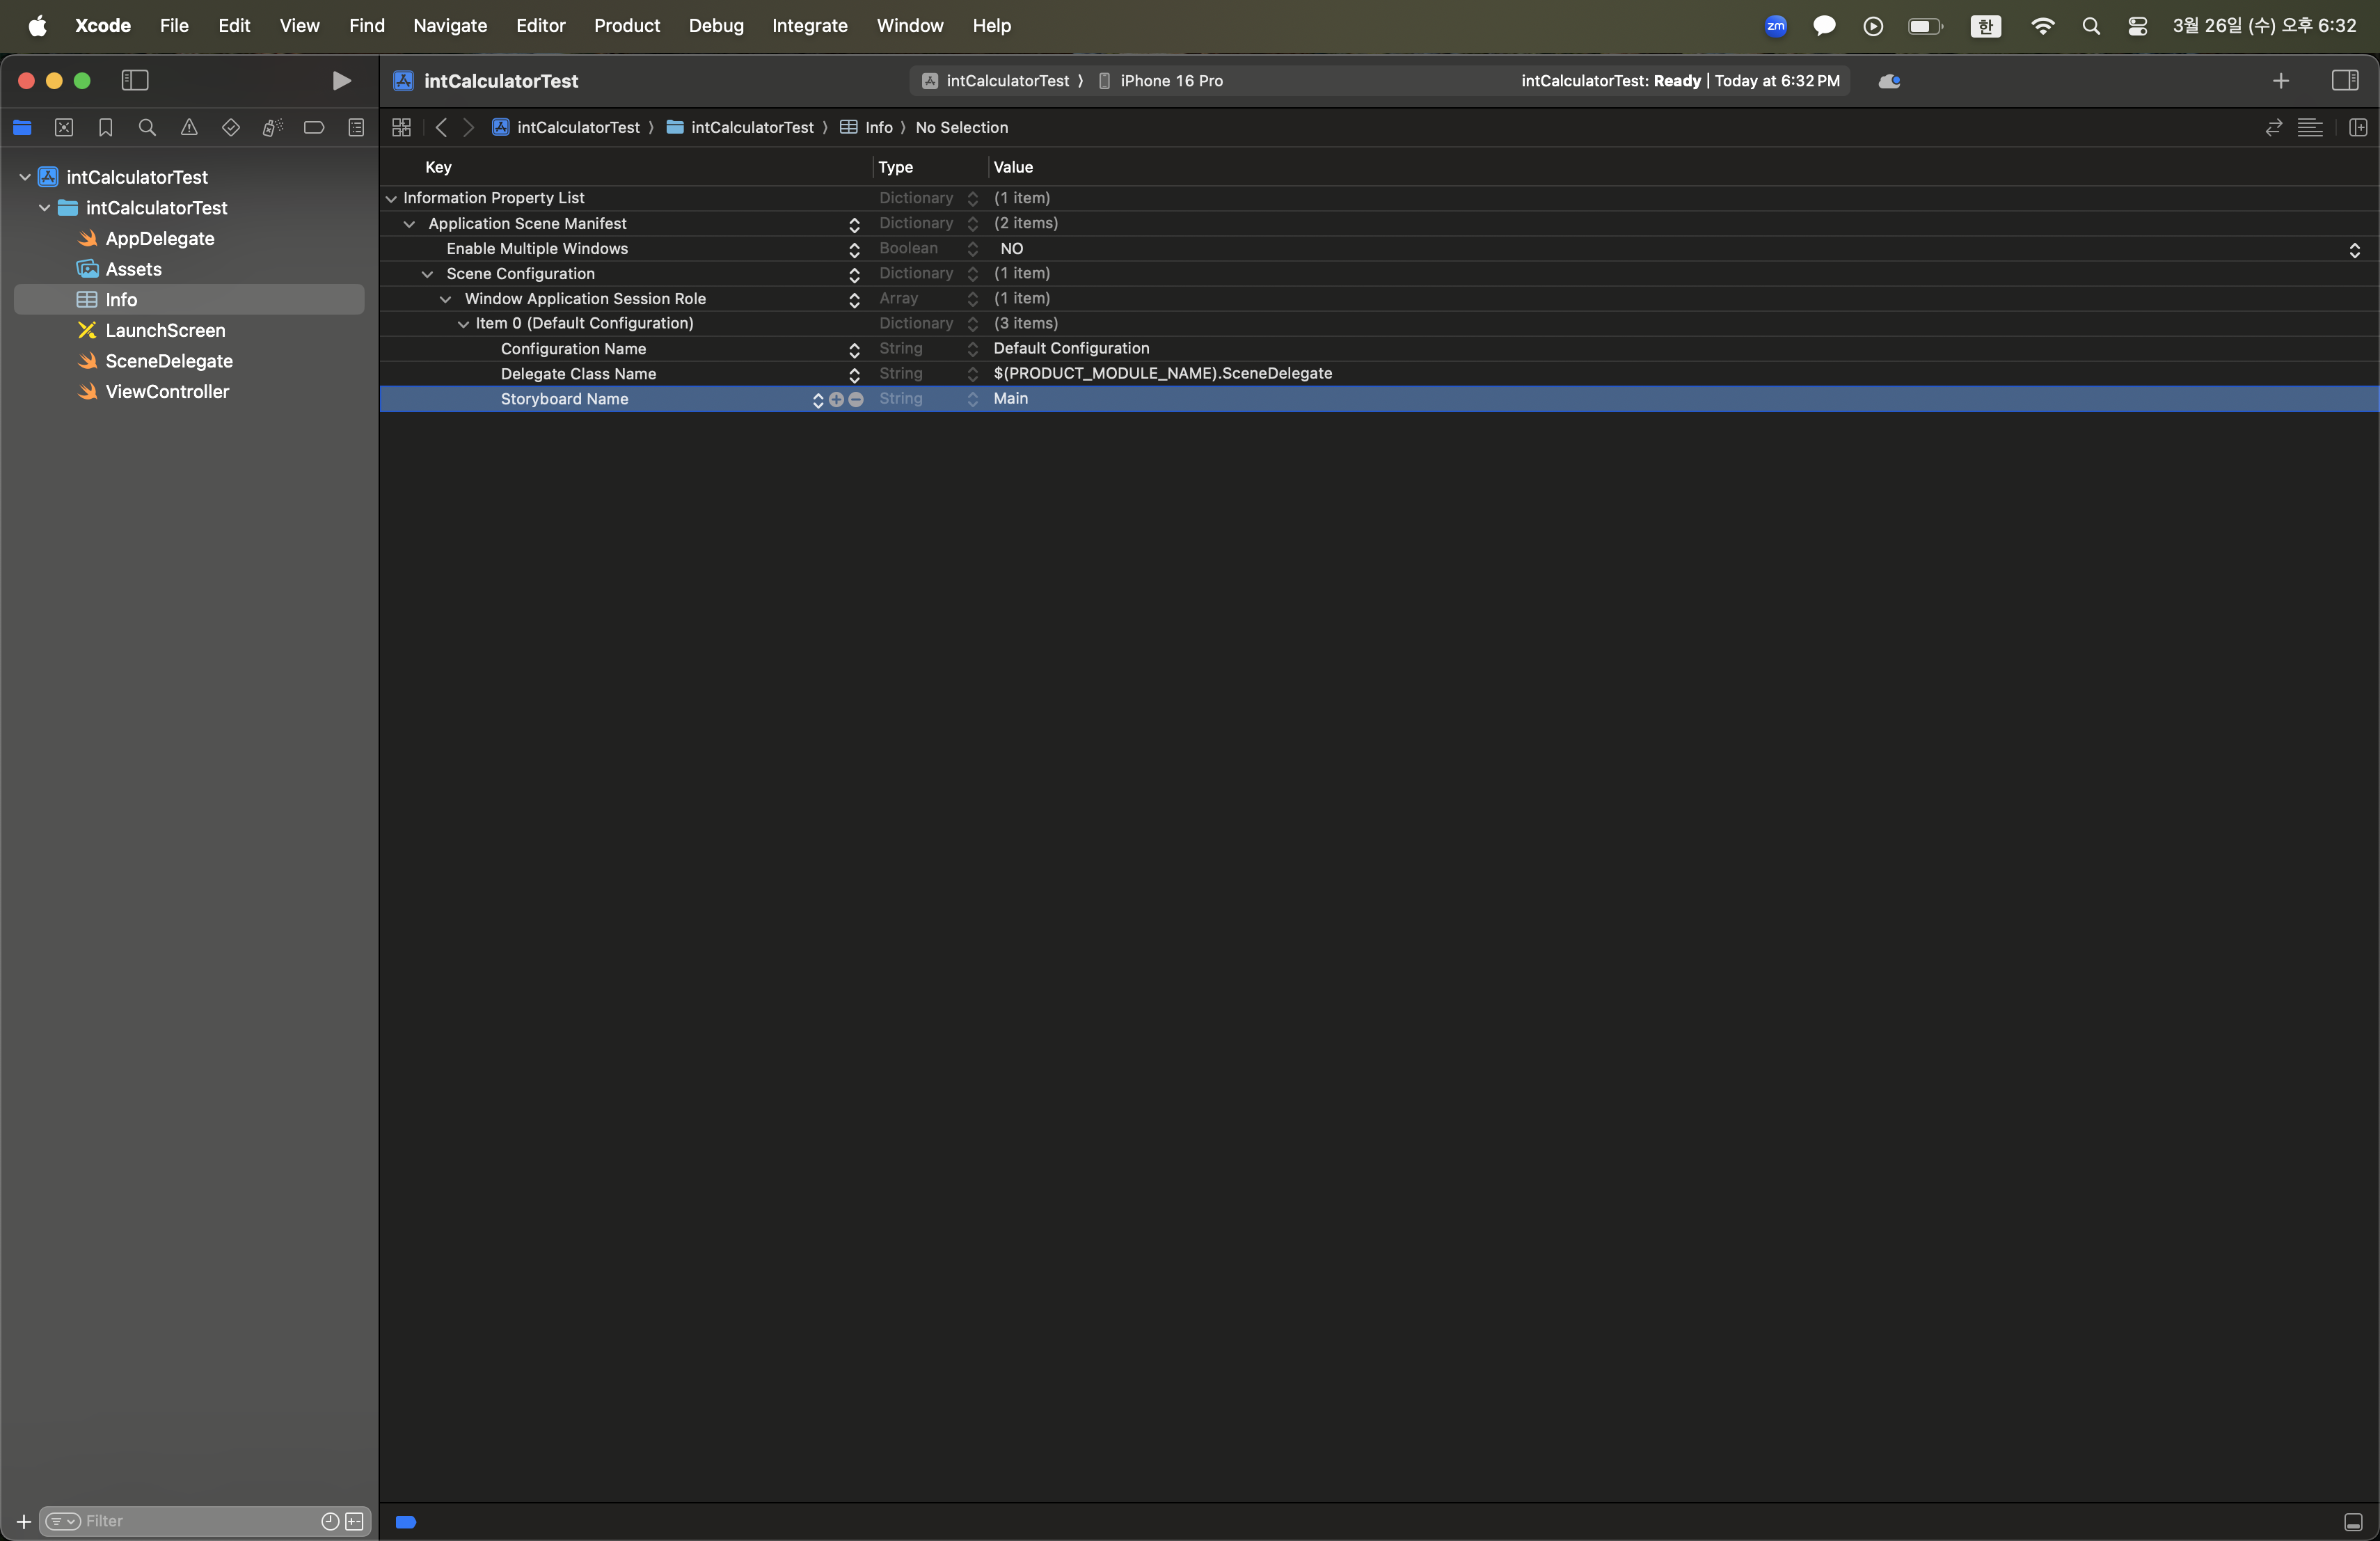
3. Project > Build Setting > UIKit Main Storyboard File Base Name 지우기

4. SceneDelegate의 willConnectTo session의 코드 수정하기
func scene(_ scene: UIScene, willConnectTo session: UISceneSession, options connectionOptions: UIScene.ConnectionOptions) {
        guard let windowScene = scene as? UIWindowScene else { return }
        let window = UIWindow(windowScene: windowScene)

        window.rootViewController = ViewController()
        window.makeKeyAndVisible()

        self.window = window
    }
Lv.1에서 작성한 코드
class ViewController: UIViewController {

    private var number = 12345

    let label = UILabel()

    override func viewDidLoad() {
        super.viewDidLoad()
        configureUI()
    }

    private func configureUI() {
        view.backgroundColor = .black

        label.text = "\(number)"
        label.textAlignment = .right
        label.textColor = .white
        label.font = UIFont.boldSystemFont(ofSize: 60)

        view.addSubview(label)

        label.translatesAutoresizingMaskIntoConstraints = false

        NSLayoutConstraint.activate([
            label.trailingAnchor.constraint(equalTo: view.trailingAnchor, constant: -30),
            label.topAnchor.constraint(equalTo: view.topAnchor, constant: 200),
            label.heightAnchor.constraint(equalToConstant: 100)
        ])
    }
}
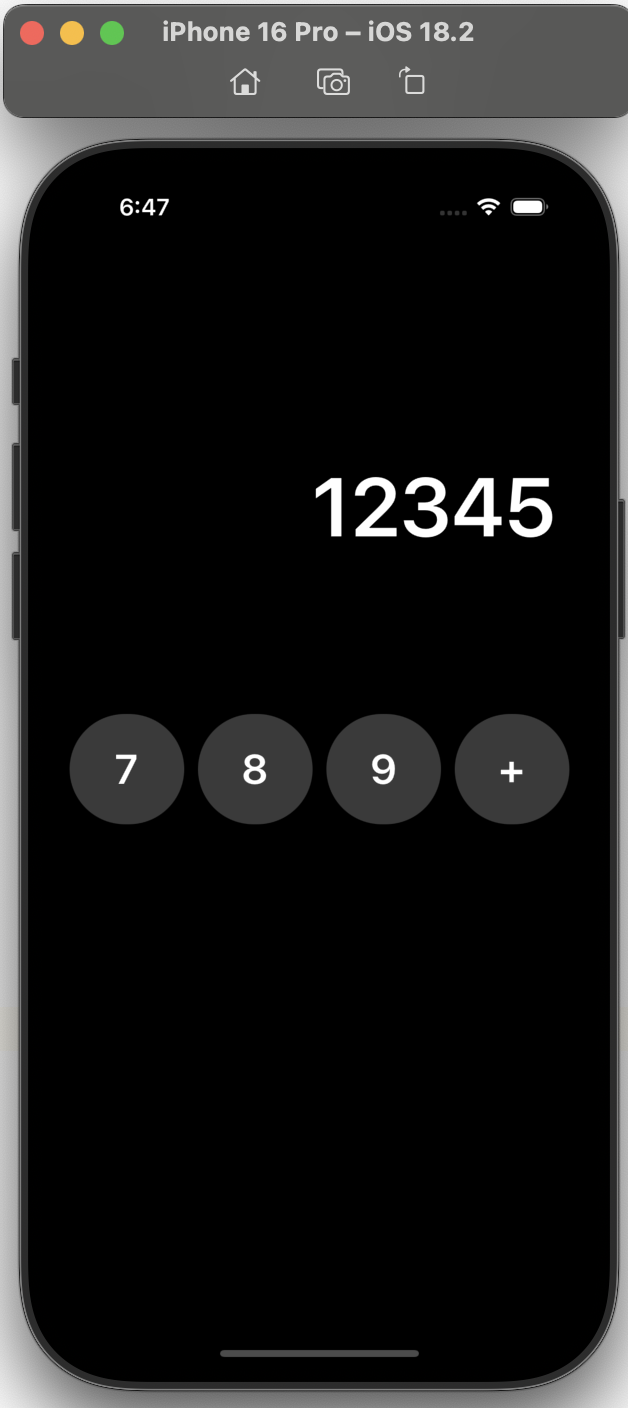
⎮ Lv. 1 빌드 결과
⎮ Lv. 2
2. UIStackView 을 사용해서 4개의 버튼을 모아 가로 스택뷰 생성. 아래와 같이 구성해보세요.
- UIButton 속성
font = .boldSystemFont(ofSize: 30)
backgroundColor = UIColor(red: 58/255, green: 58/255, blue: 58/255, alpha: 1.0)
height = 80
width = 80
layer.cornerRadius = 40
- horizontalStackView 속성
axis = .horizontal
backgroundColor = .black
spacing = 10
distribution = .fillEqually
- horizontalStackView AutoLayout
height = 80

Lv.2에서 작성한 코드
class ViewController: UIViewController {

    private var number = 12345

    var arrViews: [UIView] = []

    let label = UILabel()
    let button7 = UIButton()
    let button8 = UIButton()
    let button9 = UIButton()
    let plusButton = UIButton()
    let stackView = UIStackView()

    override func viewDidLoad() {
        super.viewDidLoad()
        configureUI()
    }

    private func configureUI() {
        view.backgroundColor = .black

        label.text = "\(number)"
        label.textAlignment = .right
        label.textColor = .white
        label.font = UIFont.boldSystemFont(ofSize: 60)

        button7.setTitle("7", for: .normal)
        button7.titleLabel?.font = .boldSystemFont(ofSize: 30)
        button7.backgroundColor = UIColor(red: 58/255, green: 58/255, blue: 58/255, alpha: 1.0)
        button7.layer.cornerRadius = 40

        button8.setTitle("8", for: .normal)
        button8.titleLabel?.font = .boldSystemFont(ofSize: 30)
        button8.backgroundColor = UIColor(red: 58/255, green: 58/255, blue: 58/255, alpha: 1.0)
        button8.layer.cornerRadius = 40

        button9.setTitle("9", for: .normal)
        button9.titleLabel?.font = .boldSystemFont(ofSize: 30)
        button9.backgroundColor = UIColor(red: 58/255, green: 58/255, blue: 58/255, alpha: 1.0)
        button9.layer.cornerRadius = 40

        plusButton.setTitle("+", for: .normal)
        plusButton.titleLabel?.font = .boldSystemFont(ofSize: 30)
        plusButton.backgroundColor = UIColor(red: 58/255, green: 58/255, blue: 58/255, alpha: 1.0)
        plusButton.layer.cornerRadius = 40

        stackView.axis = .horizontal
        stackView.backgroundColor = .black
        stackView.spacing = 10
        stackView.distribution = .fillEqually

        stackView.addArrangedSubview(button7)
        stackView.addArrangedSubview(button8)
        stackView.addArrangedSubview(button9)
        stackView.addArrangedSubview(plusButton)

        [label, stackView].forEach { view.addSubview($0) }

        [label, stackView].forEach { $0.translatesAutoresizingMaskIntoConstraints = false }

        NSLayoutConstraint.activate([
            label.trailingAnchor.constraint(equalTo: view.trailingAnchor, constant: -30),
            label.topAnchor.constraint(equalTo: view.topAnchor, constant: 200),
            label.heightAnchor.constraint(equalToConstant: 100),

            button7.heightAnchor.constraint(equalToConstant: 80),
            button7.widthAnchor.constraint(equalToConstant: 80),

            button8.heightAnchor.constraint(equalToConstant: 80),
            button8.widthAnchor.constraint(equalToConstant: 80),

            button9.heightAnchor.constraint(equalToConstant: 80),
            button9.widthAnchor.constraint(equalToConstant: 80),

            stackView.heightAnchor.constraint(equalToConstant: 80),
            stackView.topAnchor.constraint(equalTo: view.topAnchor, constant: 400),
            stackView.leadingAnchor.constraint(equalTo: view.leadingAnchor, constant: 20),
            stackView.trailingAnchor.constraint(equalTo: view.trailingAnchor, constant: -20)
        ])
    }
}
버튼을 4개 나열하듯이 생성하지 않고,
묶어주면 효율적일 것 같은데.... 이 방법 저 방법 시도해보다가 나열식으로 작성했다.
리팩토링이 시급하다.
- 시도했던 접근법
1. UIView를 담을 수 있는 배열 : [views]를 만들어둔다.
2. button 인스턴스를 1개만 만들고, for num in 0..<3 일 때 button을 [views]에 하나씩 담는다.
3. [views]를 stackView에 연결한다.
4. $0해서 컨텐츠 내용만 바꿔주면 될 것 같은데....
To be continue
⎮ Lv. 2 빌드 결과